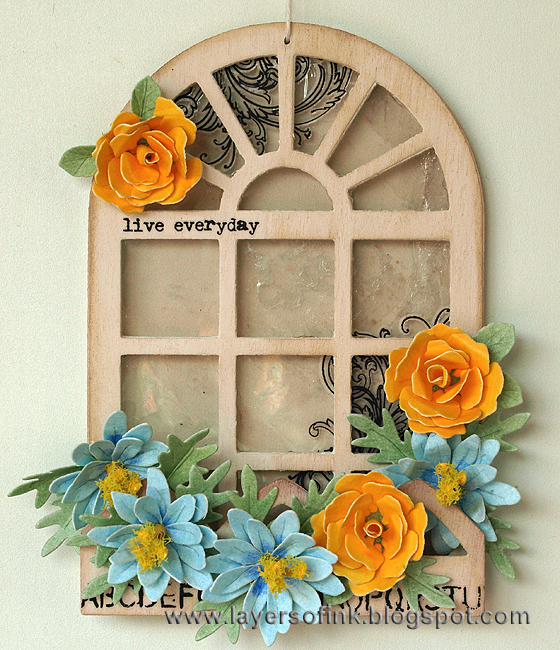
Hi everyone! Today I have a Sizzix step-by-step tutorial to share with you, for a window ornament with 3D flowers, made with Susan's Garden dies.
Susan's Garden dies by Susan Tierney-Cockburn make such gorgeous and real looking flowers and they look great showcased in the Conservatory Window. This is a great gift, or make it for yourself. It doesn't have to be a décor piece, you can also attach it to a card or a scrapbooking page. By using other flowers and colours you can easily turn it into a project for any season, but I was in a spring mood.
The Conservatory Window die is wafer-thin and works great together with the Magnetic Platform. First, I die cut it from wood veneer paper.
I wanted the window to be thick and dimensional, and die cut it quite many times from thin chipboard. Since this is a thin die, it can't handle thick material such as mat board or grungeboard, but that doesn't mean you can't make a sturdy piece.
Glue all the windows and window boxes together, add more if you want it even thicker. Leave one window piece for later.
You can leave the wood veneer as is, but I wanted a white-washed look and painted it with Picket Fence Distress Paint. Do the same on the window box.
When the paint is dry, ink the edges with Gathered Twigs. I also added a rub-on sentiment.
For a window, I used a mica sheet, first adding a rub-on flourish (cut in two). Cut the mica to fit the window and sandwich between the window and the last window piece that you saved.
Now to the flowers, I coloured some smooth cardstock with Pan Pastels, on both sides, using two shades for each paper. This is a very quick colouring method.
For the leaves, I used two shades of green.
Starting with the roses, die cut the petals from the yellow paper and the leaves and calyx from the green paper. The Magnetic Platform works really well together with these dies, saving me paper since it doesn't shift.
I used a darker orange Pan Pastel to add some colour to the inside part of each petal. The petals were shaped using Susan's Garden tools. You can find the basic technique in this and this video by Susan. These are the pieces you need to make one rose. Here's a video that explains how to assemble the flower.
Colour smooth cardstock with blue Pan Pastels and die cut the petals for the Mini Daisy. Use the same green cardstock you coloured earlier for its leaves. Vein and shape the petals for the Mini Daisy and assemble the flower. I used some yellow Flower Soft on the stamen. You can find Susan's video about this flower here.
Glue the flowers to the window, tucking the leaves in here and there.
I used leftover strips of mat board behind the box, to give it dimension and so that there would be space for some of the flowers behind the box.
The mica looks wonderful as window glass. The effect is hard to photograph, but here you can see that it is transparent, but not totally clear. You can also use a transparency and age it a with alcohol ink, or try vellum for a frosty effect.
Thank you for looking!!
Anna-Karin
Supplies:
Surfaces: Neenah Smooth Solar White Cardstock; Simon Says Stamp Birch Wood Veneer Paper; thin chipboard
Dies: Sizzix: Conservatory Window, Mini Petals, Mini Daisy
Ink: Distress Ink: Gathered Twigs
Paint: Distress Paint: Picket Fence
Pastel: Pan Pastels: Flower Colouring Kit Set, Mixed Media 1, Mixed Media 2
Embellishments: Tim Holtz Idea-ology Words Remnant Rubs, Elements Remnant Rubs; Flower Soft: yellow; US ArtQuest Mica Sheet
Tools: Sizzix: Big Shot, Magnetic Platform, Susan's Garden Tool Kit


This looks beautiful. Thank you so much for the tutorial.
ReplyDeleteYou did an excellent job! I love your window, XOXO
ReplyDeleteThis is stunning! Love the colors you used for the flowers. Good idea using many layers to make the window sturdy.
ReplyDeleteThis is stunning! Love the colors you used for the flowers. Good idea using many layers to make the window sturdy.
ReplyDeleteGorgeous! Love the window with the flourish behind them.
ReplyDeleteIts Wonderful !
ReplyDeleteGorgeous work. Especially love your gorgeous flowers. Nicola x
ReplyDelete