Hello friends! I hope you are well and that you had a good weekend. Christmas is getting closer now and it is not going to be as usual, but hopefully still good.
It is Monday and we have a new Simon Says Stamp Monday Blog Challenge for you. This is a two-week challenge and the theme is Celebration. Don't miss the last project by our December guest designer Makena MB aka avant_card on instagram.
I wanted to make something that celebrates the beauty of life and with hopes for a better 2021. I made a peaceful winter village and then wasn't sure what background to use. I often start with the background, but not this time. Right when I woke up the next morning, I got the idea to turn it into a circle shaped piece. No hard edges here.
I used Tim Holtz Holiday Village Colorize die set to create the village. Start by die cutting these two dies from Heavystock paper.
The colorize dies suggests a color at the back of each die. Die cut the die that says 'white' on the back from SSS white glitter paper and the tree from Aqua glitter paper.
The die that says 'blue' on the back was die cut from SSS Aqua Holographic paper, which creates a really cool effect.
I inked a piece of heavystock paper with Rustic Wilderness and another with Mustard Seed.
Die cut tree and light pieces from these inky paper. I also die cut the light piece from metallic gold paper - it says 'yellow' on the back of that die.
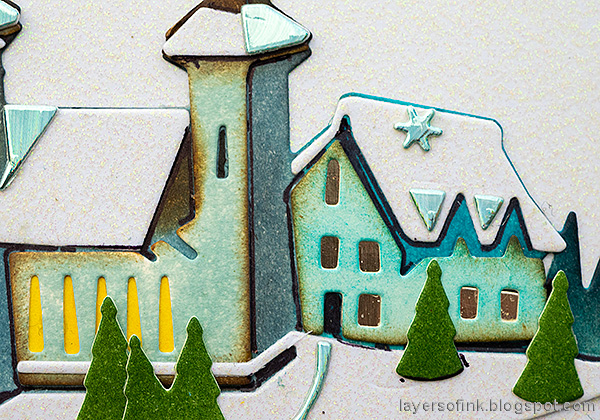
Ink the houses with various shades of blue Distress Ink, adding a little black to darken som areas and inking with brown around the edges.
Glue the yellow and gold pieces to the background as shown here. There are impressions in the paper, so it it is almost like doing a puzzle.
Continue building the scene by adding the building fronts, the white glitter paper, the holographic pieces and then the glitter tree. I cut off the star from the glitter tree, since I wanted the star to be golden.
I used a black pen to make the doors and some of the windows black and to add shadows along the buildings. This step adds dimension.
If you look closely, the black lines might appear a bit stark, but from a distance they look like shadows.
The holographic paper pieces on the roofs are shadows, which are also much more effective when you look at the village from a distance.
I really like the 3-D effect you get from the color variations and strengthened even more with the black pen work.
I didn't like the first tree that I made since the green color was too uniform. I die cut a new tree from heavystock paper and inked it after die cutting, making it possible to vary the inking more.
The background was done by tracing a circle on SSS white glitter paper with a plate from the kitchen and then making a slightly bigger circle on a piece of cardboard packaging. The white circle is 8 inches in diameter. The cardboard was distressed and inked.
The snowflakes were die cut with the SSS Snow Flurries set, from holographic paper and inked heavystock paper. I really like the varied shapes of these snowflakes.
The sentiments were stamped on heavystock paper with Tim's Tiny Text Christmas set. Even though this is a Christmas stamp set, many of the sentiments work year around.
The shifting color effect from the Holographic paper is really cool. The children keep wanting to use my holographic papers. I need to order some more.
I hope you will join us this week in our Celebration challenge. You have a chance to win a $25 gift voucher to do some fun shopping at Simon Says Stamp. You have until Monday 8am Ohio time. 1pm UK time, 2 pm CET to join in.


Gorgeous! I love the shading of the houses. So inspirational.
ReplyDeleteThank you for this tutorial. Your attention to every little detail is amazing.
ReplyDelete