Pages

Wednesday, July 31, 2013

Thank You Tammy Blog Hop

Hi everyone and welcome to a special surprise blog hop for the Sizzix Design Team Coordinator Tammy Tutterow. Tiffany suggested that we would do a little blog hop to thank Tammy for everything she does for us on a daily basis and I thought it was a great idea.

One of my best ever emails came from Tammy, about a year and a half ago, when she asked me if I wanted to join the first ever Sizzix (US) design team. I didn't even think one second before I said yes, and I love being on this great team. Tammy does a wonderful job running the team, she is always there to listen and takes such good care of all the design team members, and has created an environment where our creativity is free to roam around. Thank you so much Tammy!

Thank you Tammy Blog Hop - Layers of ink
Tammy's 'quotes for art' board on Pinterest is full of wonderful quotes and I picked one as inspiration for this tag. Like Tammy, I also love birds and fun techniques, and this tag has a little bit of both.

The tag was die cut from watercolour paper and randomly stamped with the Darkroom Door Gazette background stamp using Archival Jet Black ink. It was embossed with the English Botanical folder and I did the wax crayon resist technique that I shared in this tutorial. After applying the crayon, the tag was inked with Tattered Rose, Victorian Velvet and Frayed Burlap Distress Stains. When dry, I inked the edges with Frayed Burlap Distress Ink.

The little tag is a Vintaj blank and it was embossed in the Lowercase Typewriter folder, with a 't' for 'Tammy'. I painted it with two patina inks for an almost marble effect and burnished it when it was dry. The second tag was die cut with the Tiny Tabs & Tags die, from a leftover piece from the scroll (see below). I attached them to the ribbon with a Tim Holtz Wire Pin.

The butterfly was a leftover from my burlap panel tutorial from earlier this week. Modeling Film was covered with natural sticky-back canvas, die cut, embossed, heated and shaped. Then it was inked with Antique Linen and Gathered Twigs.

I really liked this quote that I found in Tammy's Pinterest board. It was printed on manila cardstock and cut into strips.

I used the pretty Bird Scroll die by Brenda Walton and die cut the bird and wing from grungeboard. To give the bird texture, I covered it with Coarse Molding Paste, using a palette knife. It gives a great texture with lots of tooth. After it dried, I painted it with Distress and Adirondack paints, adding gold highlights with Tarnished Brass.

Vintage dictionary paper from Bazzill was glued on top of grungeboard and the scroll was die cut from it. The edges were inked with Frayed Burlap. I also added a little nest made from cheesecloth which had been dyed with Antique Linen Distress Stain and a pen nib, slightly coloured with patina ink.
 
Don't forget to visit the blogs of the other design team members participating in the hop, for some great inspiration:
 
 
Thank you for the visit!
 
Happy crafting!
 
Anna-Karin
 
Supplies:
Surfaces: Canson Montval watercolour paper; Ranger Manila cardstock; Tim Holtz Idea-ology Grungboard; Bazzill Antique 6 x 6; Wendy Vecchi Whiteout Modeling Film; Claudine Hellmuth Natural Sticky-Back canvas
Stamps: Darkroom Door: Gazette Background stamp
Ink: Ranger Archival Ink Jet Black; Distress Ink: Frayed Burlap, Antique Linen, Gathered Twigs; Ranger Patina Ink: Marine, Verdigris
Stain: Distress Stain: Antique Linen, Tattered Rose, Victorian Velvet, Frayed Burlap
Paint: Distress Paint: Antique Linen, Walnut Stain, Tarnished Brass; Adirondack: Aqua, Pool
Medium: Golden Artist Paint Coarse Molding Paste
Crayon: Caran d'Ache Neocolor wax oil pastel white
Embellishments: Tim Holtz Idea-ology: Pen Nibs, Chit Chat stickers, Wire Pins, Jump Rings; Vintaj: Blank Circle Tag; lace trim; cheesecloth

Tuesday, July 30, 2013

12 tags of 2013 July

Hello stampers! Today I am sharing my version of Tim Holtz 12 tags of 2013 July, just in time. I had lots of fun with this one.
 
I love using my brayer and I thought Tim's technique for the July tag with the brayer was awesome, a great random effect, just what I like. The shattered stains technique is a favourite of mine (I used it on this layout for example) and here I used it on the vintage camera and on the picture wheel.

I used Wild Honey, Spiced Marmalade and Peacock Feathers Distress Stains for the background and inked with Gathered Twigs. The stamping was done with Archival Jet Black and Monarch Orange. I used photography related stamps and a number ledger stamp.
 
Since I have a photography theme on my tag, I wanted to use the vintage camera die. It was die cut from grungeboard, painted with Rock Candy crackle. It was coloured with Gathered Twigs, Black Soot and Brushed Pewter Distress Stain, and inked around the edges with Black Soot Distress Ink.
 
  
The label was stamped with Archival Ink Sienna, which is a really nice colour and I used a favorite sentiment from Simple Sayings.
 
The Picture Wheel was die cut from grungeboard and I used Peacock Feathers and Gathered Twigs Distress Stain to colour the crackles and then inked with Black Soot Distress Ink around the edges. I cut the picture wheel so that only five windows remained. Behind the windows I glued mica sheets (a fave of mine), overlapping some of them. Each window was stamped with a letter, spelling 'photo'.

The crinkle ribbon was repeatedly stamped with the photo negative stamp, and inked with Spiced Marmalade and Peacock Feathers Distress Stain.

Thank you so much for looking!!

Happy stamping!

Anna-Karin

Supplies:
Surfaces: Ranger Manila Cardstock
Dies: Sizzix: Picture Wheel, Vintage Alarm Clock & Camera set
Stamps: Stampers Anonymous Tim Holtz: Simple Sayings, Warehouse District, Mini Muse, Going Somewhere; EK Success alphabet stamps
Ink: Ranger Archival: Jet Black, Sienna, Monarch Orange; Distress Ink: Gathered Twigs, Black Soot
Stain: Distress Stain: Wild Honey, Spiced Marmalade, Peacock Feathers, Gathered Twigs, Brushed Pewter
Paint: Ranger Distress Crackle Paint Rock Candy
Embellishments: Tim Holtz Idea-ology: Game Spinners, Mini Gears, Mini Fasteners, Elements Tissue Tape, crinkle ribbon; US ArtQuest mica

Monday, July 29, 2013

Summer Burlap Panel Tutorial

Hello everyone! I hope you had a good weekend. This week we are all about summer and sunshine at Simon Says Stamp Monday Challenge Blog.
 
I had so much fun dressing up a Tim Holtz 6 x 8 Burlap Panel into a piece remembering beautiful childhood summers. So much fun, that I took step-by-step photos to show you how I made this:

Summer Burlap Panel Tutorial - Layers of ink
A large part of our summers as children were spent at the sea or at one of the many lakes in the vicinity. I really like this photo of my sister and me taken at a lake, depicting summer. I wanted to keep the great burlap texture of the panel and not cover it up with papers, but I still wanted more patterns and decided to play around with a transfer technique. The flower patterned paper was transferred to the panel, and since transfers are to some degree transparent, you can still see and feel the texture of the burlap. I was really happy with how it turned out.

Start with covering a part of the panel with gesso, I painted it where I planned to do the transfer, but also lightly over most of the panel. The part where the transfer would go was painted with three layers of gesso, letting it dry in between. Transfers are transparent, especially where the colour is light. White areas will be completely transparent. If I didn't first apply the gesso, the transfer would look very dark.

Tear the edges of a piece of patterned paper. The torn edges make the transfer blend better into the panel. Apply a medium layer of matte multi-medium where the transfer will go. Place patterned paper with the print down and burnish thoroughly with a bone folder. I used matte medium instead of glossy, since any medium ending up outside the transfer will hardly show at all. 
 
Leave to dry completely. Then mist the back of the paper with water and start rubbing the paper away with you finger. Apply more water as you go along. You might need to let it dry once to check if there are any white pieces of paper left, if there is, mist again and rub off.
 
Here's the result, the tiny flowers on the patterned paper have been transferred to the panel. Pretty cool. You can still see and feel the texture of the burlap.
 
I dry-brushed Broken China here and there because I wanted some blue on the background. 
 
I wanted even more texture on my panel and applied Wendy Vecchi's white embossing paste through her Never Enough Hearts stencil, with a palette knife. Leave to dry.
 
When the hearts were dry, I painted them with Barn Door and Fired Brick Distress Paint and when the paint was dry, a little bit of Antique Linen was dry-brushed on top.
 
I wanted a flowering tree branch and die cut a lot of small flowers from Neenah cardstock, using the Tattered Flower Garland die. They were inked lightly around the edges with Tattered Rose distress ink. I used my Susan's Garden tool kit to shape them, which is so easy. Love this tool kit.
 
I layered the flowers together with a brad in the centre and grabbed the legs of the brad with tweezers and dipped the flowers into UTEE. The UTEE was melted in my melting pot. Be careful, it is very hot. Hold them for a little while with the tweezers before placing the flowers to cool down on your craft sheet. Love this faux porcelain look. I tried to take a photo of the dipping process, but my camera is hard to manoeuvre with my left hand only so it got blurry.
 
To make the branches, I covered Wendy Vecchi white modeling film with natural sticky-back canvas and die cut with the Branch Tree. The branches were inked with Gathered Twigs and Walnut Stain. I heated the branches with my heat gun and shaped them. The film keeps its shape perfectly.
 
The leaves were die cut with the Tattered Flower Garland, from Core'dinations Distress cardstock (Bundled Sage). I veined and shaped them with the Susan's Garden tools and inked the edges.
 
Another piece of white modeling film was covered with natural sticky-back canvas and I die cut butterflies from it. The butterflies were embossed in a ruler folder, placing numbers in the centre. I ended up only using one of these.
 
The butterfly was inked with Barn Door and Aged Mahogany distress ink. It was heated with my heat gun and the wings were shaped.
 
The ornate plate was painted with Broken China, Bundled Sage and Barn Door Distress Paint. When dry, I sanded it lightly. The brads were painted with Broken China too.
 
The compass was painted with Broken China and Bundled Sage, and when the paint was dry, I burnished the paint away from the raised areas.  
 
At the side of the canvas, I hang a Word Stick and Philosophy Tag, also painted. I used a screw eye to hang them from a swivel clasp. First I placed this underneath the canvas, which is why you don't see it on the first photo of the post. Later, I changed my mind and moved it to the side.
 
On this photo, you can see the metallic pieces hanging to the left of the panel. The ruler ribbon was painted with Antique Linen and inked with Gathered Twigs. I also used a word band, with paint rubbed into it.

Join us this week in our summer and sunshine challenge and you can be the lucky one to win a $50 gift voucher from Simon Says Stamp.

50dollar_voucher_600px

Thank you for looking!!

Happy summer crafting!

Anna-Karin

Supplies:
Surfaces: Tim Holtz Idea-ology District Market: Burlap Panel Bare 6 x 8Core'dinations Tim Holtz Distress Color-Core cardstock; Claudine Hellmuth Natural Sticky-Back Canvas; Wendy Vecchi Clearly For Art Whiteout Modeling Film; BasicGrey: True Love 6 x 6; Neenah Classic Crest Solar White
Dies: Sizzix: Tattered Flower Garland, Branch Tree, Mini Butterflies
Embossing folder: Sizzix: Bottle Caps & Rulers
Stamps: Hero Arts: Basic Lowercase Letters
Ink: Distress Ink: Antique Linen, Frayed Burlap, Barn Door, Aged Mahogany, Tattered Rose, Gathered Twigs, Walnut Stain; Ranger Archival Ink Jet Black
Paint: Distress Paint: Broken China, Barn Door, Antique Linen, Fired Brick, Bundled Sage
Embossing powder: Ranger Clear UTEE
Medium: Claudine Hellmuth Multi-Medium Matte, Gesso; Wendy Vecchi White Embossing Paste
Stencil: Wendy Vecchi Stampers Anonymous: Never Enough Hearts
Embellishments: Tim Holtz Idea-ology: Word Bands, Ornate PlatesChit Chat stickers, Ruler Ribbon, Compass Coins, Long Fasteners, Swivel Clasps, Philosophy Tags, Word Sticks, Screw Eyes; Studio Calico: Tiny Hearts
Tools: Sizzix Big Shot, Susan's Garden Tool Kit; Ranger Melting Pot

Saturday, July 27, 2013

CSI case file #82 - Soccer

Hi everyone!! I hope you are all doing well. The new CSI case file is a fun one, with gorgeous colours:
 
 
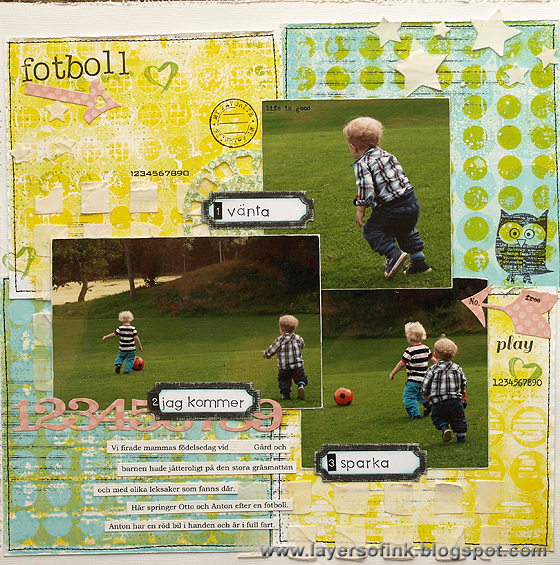
I just got a gelli plate and immediately had to try it out, the background pieces on this layout were my first attempts. Love how they turned out.
 
CSI case file #82 - Layers of ink
From the evidence items I used: stamps, rub-ons, hearts, stripes, bird and wet medium. From the testimony items, I used several photos with captions, and the layout is also about playing and having fun. The photos are of my son and his cousin running after a ball, the captions read: 'wait, I am coming, kick'. I love that first photo when he sets off, with a red tractor in his hand too.
 
The four squares were printed on my gelli plate, using Hansa Yellow Fluid Golden paint and Broken China Distress Paint. I pressed various stencils and stamps on the plate to get the patterns, without much plan. I almost didn't want to cover them up with photos! The squares were stitched to background paper and I stamped them with a Hero Arts lined stamp using Jet Black ink and with a splatter stamp using Grass Chalk ink. Finally, I applied molding paste through two different stencils.

 On this first square, I placed a circle stencil over the plate and then pressed a grid stamp on top, which is why you see the grid pattern inside the circles only. Pretty cool. The heart was stamped with Grass ink and the numbers are a Tim Holtz rub-on. I also die cut a picture wheel from patterned paper and tucked behind the photo.

This paper was printed with yellow paint first, using a circle stencil and then again with blue paint and a different circle stencil. I love using circles and here they fit well because of the topic of the layout.

The owl was stamped with Archival Jet Black ink. I liked how the circles look behind its eyes.

On this one, I first placed a circle stencil on top of the paint on the gelli plate and then pressed another stencil will lines on top. The labels were die cut with the Sizzix Charming This & That die.

Thank you so much for looking!! Have a great weekend!

Anna-Karin

Supplies:
Surfaces: Derwent smooth watercolour paper; Neenah Solar White Smooth cardstock; Basic Grey and MME 6 x 6 paper pads; Core'dinations Tim Holtz Color-Core cardstock
Dies: Sizzix: Note to Self, Charming This & That, Arrows, Banners, Chevrons & Clouds
Stamps: Hero Arts: Tiny Ink Spots S5637, Large Canvas Stripes S5433, Grid Pattern ST503, My Favorite AC030, Remember AC028, Newspaper Owl D5562, Basic Lowercase Letters; Graphic 45 Typewriter Letters
Ink: Ranger Archival Jet Black; Hero Arts: Grass Chalk Ink
Paint: Distress Paint: Broken China; Golden Fluid Acrylics: Hansa Yellow
Stencils: Hero Arts: Irregular Checkerboard Background; The Crafter's Workshop: Mini Circle Grid, Mini Circle Regiment, Mini Stars; Wendy Vecchi: Yikes...Stripes
Medium: Golden Artist Paint: Light Modeling Paste
Embellishments: Tim Holtz Idea-ology: Remnant Rubs Words, Numbers, Label Letters
Tools: Gelli Plate; Sizzix Big Shot

Wednesday, July 24, 2013

For You Pop-Up Card

Hi everyone! Today I am sharing a project on the Sizzix blog, it's a pop-up card with fun techniques.
 
For You Pop-Up Card
I love to make little houses and realised that the Antique Handles look like an ornate roof, especially when used together with the coordinating textured impressions folder (which comes with the die). Have a look at your dies and see if you can’t use them for something else than they were intended for, it’s lots of fun. The embossing folder is Karen Burniston's Birds folder and there is also a pop-up on the inside.

To see the pop-up inside and to read more about how I made this, it is all on the Sizzix blog.

Thank you for stopping by!!

Anna-Karin

Tuesday, July 23, 2013

Collaborative Accordion Flip Album

Hello! In April, Karen Burniston asked me if I wanted to contribute to a collaborative accordion flip album, together with the other designers she calls her 'Super Six'. I am very happy to be one of them! Karen's dies and embossing folders are the best.
 
We each made a two panel accordion card, and the only guidelines were to include a photo of ourselves, blog address, and to do just have fun creating something in our own style. The end result is fabulous, with the different panels connected together. If you are at Summer CHA, check out the final album at the Sizzix booth.  
 
This is my contribution, lots of ink, stamping, birds, sentiments and little details. I took a few step-by-step photos when I made this. If this was just a normal two panel accordion card you would cut off the flap on the right hand side, but since it was going to be connected into a long album, I couldn't cut it off.
 
I started out by die cutting the accordion flip panels from manila cardstock, which is heavy and a great base for an accordion card.
 
They were inked with Antique Linen, Salty Ocean, Broken China and Gathered Twigs and splattered with water for texture.
 
The panels were die cut using the coordinating Bracket, Frame & Label die. I smeared Distress Stains on my craft sheet, misted the paper with water and pressed into the ink. This watercolour look is a favourite of mine.
 
When it came to colour, I wanted to include some red details. Thinking of how to display the photo, I decided to place it inside a frame and used Karen's Fancy Frame. It was die cut from manila cardstock, painted black and embossed with red embossing powder. Because the frame was a little bit too large for the panel, I had to trim it and also removed the two pieces at the side. After cutting them off, I realised they looked like little crowns (see the little piece at the top of the photo) and used one as a crown for the bird. The wood veneer woman was also embossed with the red powder.

I love to add text elements to my projects and covered manila cardstock with old Swedish dictionary paper. The definitions on the large bird have to do with birds and wings, a fun little detail. The birds were die cut with the Thanks Set and Birds on a Wire dies.
 
The accordion panels were stamped with my favorite alphabet background stamp using Broken China and Gathered Twigs, holding the cling stamp in my had for random impressions. I also stamped it with bird and sentiment stamps. The bracket panels were stamped with a swirl stamp and Tumbled Glass ink.

I used one of my favourite word bands and rubbed paint into the words. The bird was inked and got a pearl eye. I attached the pen nib with a wire, since I knew this card would be handled quite a bit, I wanted everything to be stuck down real well.

The 'a' tag is a Vintaj blank, which was embossed in the Lowercase Typewriter folder, painted with Agate Patina ink and then burnished to reveal the letter.

The blue star was die cut from grungeboard inked with Salty Ocean, stamped with alphabet stamps and coated with Glossy Accents. The wood veneer stars were inked with Gathered Twigs and coated with Glossy Accents.

On the second panel, I stamped another favorite sentiment, and added two little Idea-ology gears and a little wood veneer bird inked with Salty Ocean.

The bird is coated in Glossy Accents, which is something I love to do. On this photo, you can see the silver shine from the Brushed Pewter Distress Stain better.

Thank you so much for stopping by!

Happy crafting!!

Anna-Karin

Supplies:
Surface: Ranger Manila cardstock; 7 Gypsies Postale Ledger 8 x 8; Tim Holtz Idea-ology grungeboard; old dictionary paper
Dies: Sizzix: Accordion Flip 3-D Album, Bracket, Frame & Label, Fancy Frame, Birds on a Wire, Thanks Set, Star & Circle
Embossing folder: Sizzix DecoEmboss Lowercase Typewriter
Stamps: Stamper's Anonymous Tim Holtz: Simple Sayings, Tiny Textures, Warehouse District, Mini Ornates, Going Somewhere
Ink: Ranger Archival Jet Black; Distress Ink: Salty Ocean, Antique Linen, Gathered Twigs, Walnut Stain, Broken China; Ranger Vintaj: Agate Patina Ink
Stain: Distress Stain: Tumbled Glass, Broken China, Brushed Pewter
Paint: Distress Paint: Antique Linen, Black Soot
Embossing powder: Judikins red
Embellishments: Tim Holtz Idea-ology: Word Bands, Mini Gears, Mini Fasteners, Pen Nib; Vintaj: Blank Circle Tags; Studio Calico wood veneer: Potty People, Tiny Stars, Birds
Adhesive: Ranger Glossy Accents, Wonder Tape
Tools: Sizzix Big Shot, Vintaj Reliefing Block